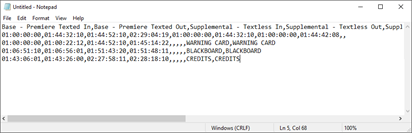
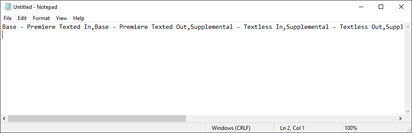
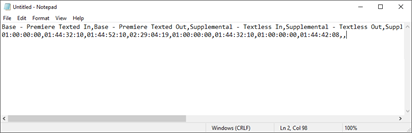
- Base - Premiere Texted In
- Base - Premiere Texted Out
- Supplemental - Textless In
- Supplemental - Textless Out
- Supplemental - Daytime In
- Supplemental - Daytime Out
- Supplemental - Uncensored In
- Supplemental - Uncensored Out
- Clip Name
- Clip Description
Note: You must type the column headers with the exact strings, in the exact order as the list above.
Column Headers
- The start timecode of the texted content from within the MOV source file. This value must be the same as the beginning timecode of the MOV file.
- The end timecode of the texted content from within the MOV source file;
- The start timecode of the textless content from within the MOV source file;
- The end timecode of the textless content from within the MOV source file;
- The start timecode of the daytime MOV source file;
- The end timecode of the daytime MOV source file;
- The start timecode of the uncensored MOV source file;
- The end timecode of the uncensored MOV source file;
- Data for the Clip Name on the second row must be blank;
- Data for the Clip Description on the second row must be blank.
Second Row
Note: The duration of a clip must be the same across all sections and its timecodes must be included within the source file it is referenced in.
Subsequent Rows